Picture segments are drawn on a canvas using a mouse. Segments may be deleted one by one or the entire canvas may be cleared.
The characteristics of picture segments are specified by controls. These controls are arranged on control cards. There are three control cards. These are tool, palette and font.
The last picture segment drawn may be moved on the canvas. This provides a means to control the arrangement of segments with respect to each other. Pictures may be written to and read from a picture file on the host server.

The five buttons shown above, when clicked, clear the canvas, delete (undo) the last segment drawn, read a picture, write a picture or display this help file. The "Clear" button clears the canvas to a background color determined by the currently selected color. The "Read" button cycles through the set of pictures that have been written.

The three buttons shown above, when clicked, determine which control card is displayed.

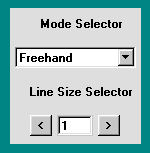
The tool control card shown above is used to select the picture segment type (drawing mode) and the line size for those picture segments that consist of one or more lines.

The palette control card shown above is used to select a color for a picture segment. Twenty colors are available for selection. These twenty colors are displayed at the bottom of the palette card. A color is selected by clicking on it. The selected color is distinguished by a black rectangle surrounding it.
A custom color may be generated by choosing its' red, green and blue components using the appropriate controls at the top of the palette card. The buttons marked ">>" increment the color values by 25, while the buttons marked ">" increment the values by 1. Similar buttons marked "<<" and "<" decrement the color values. A value may be entered directly into a text input component by first selecting it by clicking on it and then typing the desired value followed by "Enter". Color values are restricted to those between 0 and 255. The generated custom color is displayed in a rectangle below the controls.
A custom color may be selected by first including it as one of the twenty available colors. This is done by clicking the "Add" button. When this is done the first color is replaced by the custom color which becomes the selected color. The twenty colors may be scrolled to determine which color is replaced by clicking the "Scroll" button.
A continuous range of colors may be generated. This is done by clicking the "Mix" button. To generate a specific range of colors do the following. Generate a custom color to end the range and add it as the first color of the twenty available colors by clicking "Add". Then click "Scroll" to make it the last color. Then generate another custom color to start the range and add it as the first color by clicking "Add". Finally, click the "Mix button.
Color ranges may be saved by clicking the "Save" button and restored by clicking the "Restore" button. The "Restore" button cycles through the saved ranges together with the original range of default colors.

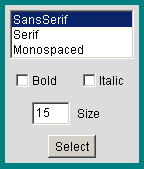
A font is required for the text drawing mode. Such a font is specified by items on the font control card shown above. The font type is selected by choosing an item from the list component at the top of the font control card. The following font types are supported:
To activate a new font click the "Select" button at the bottom of the font control card.
Press the mouse button on the canvas to define the start point of the line, then drag the mouse and release the button at the lines end point.
Press the mouse button on the canvas to define a corner point of the rectangle, then drag the mouse and release the button at the rectangle's opposite corner point.
The size and position of an oval is defined by its' enclosing rectangle. Press the mouse button on the canvas to define a corner point of this rectangle, then drag the mouse and release the button at the rectangle's opposite corner point.
Click the canvas to define the first point and then drag the mouse releasing the button at each subsequent point. Finally, close the polygon by selecting the first point again. The program will consider the polygon closed and finished when a point within five pixels of the first point is selected.
Curves are defined by four points, the curve's start point and end point and two control points. To specify the start and end points, simply click on the canvas. A dotted line will then be drawn between these two points. Next, define the shape of the curve by dragging each of the control points using the mouse. One control point is moved by the mouse normally and the other control point is moved by the mouse with the SHIFT key held down. Be careful to hold the mouse button down when defining the curve's shape releasing the button only when the desired shape is shown by the dotted outline. If the SHIFT key is down when the desired curve is obtained, be careful to release the mouse button before releasing the SHIFT key.
Curved shapes may be filled with color by drawing two filled curves with the same start and end points. You can make final adjustments to connect the two segments correctly by moving the last segment after it is drawn.
Click the canvas at the point where you wish text to be written. A rectangular cursor indicating the size of the letters is then drawn. To enter text simply type. Minimal editing is provided with the BACKSPACE key. When finished hit the ENTER key. The cursor is then removed.